さて、前回はGCP側の設定やPC側の設定について解説してきました。
今回は実際のpyコードを紹介していきます。
前回記事をご確認いただけていない方は、以下の記事をご確認ください。
ファイル構成概要
まずはファイル構成の説明をしていきます。この通りでなくても大丈夫ですが、呼び出すモジュール群(自分で作成するスクリプトを含みます)をfunctionsディレクトリに入れています。flaskとかフレームワークに慣れている方にとってはmodelsディレクトリというようなイメージですかね。ただ、今回はほぼ関数のみなので、functionsという名前で作成しています。
.dirとなっている部分はdirectoryです。
-speech_to_text.dir
  |-functions.dir
    |-  __init__.py
    |- audio_input2.py
    |- cloud_speech_sample.py
    |- templatelike.py
 |- pysimplegui.py
 |- result.wav
正直pyファイルネームは適当に作りすぎているので、本来は機能別に切り分けてわかりやすいファイルネームにされることをお勧めします(リファクタリングせずにまんま出ししてすみません。。)
pysimplegui.py: PySimpleGUIを使ってGUIと関数を動作させるpyファイル
さて、まずは最終的に画面を生成して、マイクによる音声認識やspeech-to-text APIを利用した文字起こしをするスクリプトを集約して実行するためのpyファイルです。
なにはともあれ、コードの全体を貼っていきます。一部使えないような機能も含んだままですが、ご容赦ください。
import PySimpleGUI as psg
from functions import templatelike
import functions.audio_input2 as ad
import functions.cloud_speech_sample as speech

"""
テーマカラーの設定
"""
psg.theme("DarkBlue1")


def print1():
    """
    ここにspeech to textのshortをいれる
    変数名がdispatch_dictonaryで分岐されて呼び出される形式。とりあえずprint1としてる
    """
    ad.audio_input()
    local_file_path = "/Users/sugimurakazuya/pycharm/speech_to_text_fromgithub/result.wav"
    short_long = speech.time_mesurement(local_file_path)
    text = speech.audio_recognize(local_file_path, short_long)

    return text


def print2():
    """
    ここにspeech to textのlongをいれる
    変数名がdispatch_dictonaryで分岐されて呼び出される形式。とりあえずprint2としてる
    """
    return templatelike.recording_end()


dispatch_dictionary = {"short": print1, "long": print2}

"""
layout設定用
最後の2つが、結果表示用Txt
"""
layout = [
    [psg.Text("Please enter your title")],
    [psg.Text("Title", size=(15, 1)), psg.InputText("title")],
    [psg.Button("short"), psg.Button("long")],
    [psg.Txt("", size=(20, 1), key="output_title")],
    [psg.Txt("", size=(20, 5), key="output_record")],
]


window = psg.Window("Recording short_term").Layout(layout)


"""
event response:  BottneのValue
values response: InputText("title")の入力データ
"""
while True:
    event, values = window.read()
    if event in dispatch_dictionary:
        func_call_back = dispatch_dictionary[event]
        value = func_call_back()
        window["output_title"].update(values[0])
        window["output_record"].update(value)


window.close()
実施内容の概説
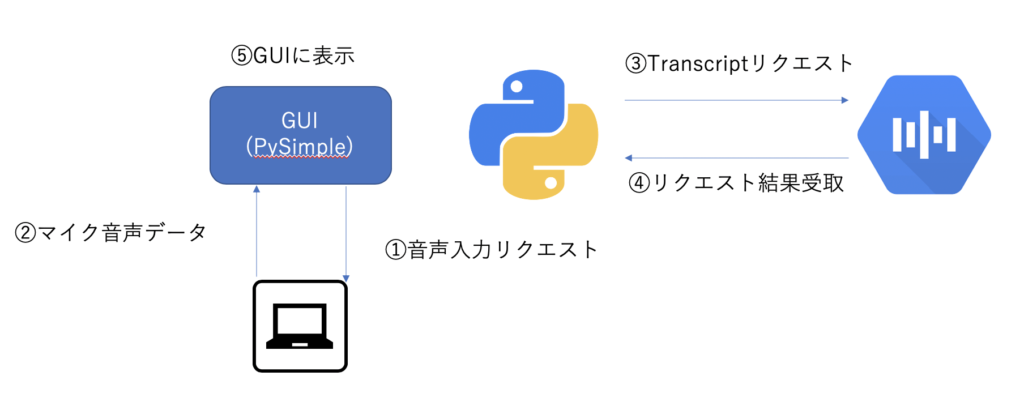
ザクっと説明します。pysimpleguiを使って、windowを表示させて、そこに音声認識とAPIによる文字起こしを起動させるためのボタンを配置している機能部分です。初回に提示したイメージのpysimpleguiとローカルPCの画面とのやりとり部分がメインとなります。画像の①音声入力リクエスト⑤GUIに表示が対象です。
PySimpleGui Window画面を作成する
画面を作成している部分は主に以下の部分です。
"""
layout設定用
最後の2つが、結果表示用Txt
"""
layout = [
    [psg.Text("Please enter your title")],
    [psg.Text("Title", size=(15, 1)), psg.InputText("title")],
    [psg.Button("short"), psg.Button("long")],
    [psg.Txt("", size=(20, 1), key="output_title")],
    [psg.Txt("", size=(20, 5), key="output_record")],
]


window = psg.Window("Recording short_term").Layout(layout)
変数layoutの中に配列形式でwindow_layoutの設定内容を記載していきます。シンプルに配列内に上から順々に設定を作っていくと、window表示のフォーマットが完成します。Textでpsg(PySimpleGuiのimportをasで呼び名変更したもの)に入れていきます。
ちなみにTextとTxtを分けていますが、両方とも同じテキストです。なので、特段違いはありません。ElementとしてはT==Txt==Textです。Txt部分は表示結果を出すために利用しているという意味で、今回は使い分けていますが、Textで入れても同様の結果になります。
下のイメージが出来上がりなので、実際のコードと見比べて比較・確認してみてください。

PySimpleGui クリックするボタンによる動作の分岐
次は、上の画像内に存在するshort/ longそれぞれのボタンをクリックした際に、実行させる動作についての解説です。
大枠としては、①windowで実行された内容をread()で受け取り、event/ valuesのそれぞれの変数に格納していき、②dispatch_dictionaryという自分で設定した条件分岐用のリストに入れて関数を呼び出す、という流れになります。
"""
event response:  BottneのValue
values response: InputText("title")の入力データ
"""
while True:
    event, values = window.read() #①の部分
    if event in dispatch_dictionary:
        func_call_back = dispatch_dictionary[event]  #②の部分
        value = func_call_back()
        window["output_title"].update(values[0])
        window["output_record"].update(value)
dispatch_dictionaryは以下の部分が関連します。dictで作成してあり、それぞれshortがeventで呼ばれればprint1を、longが呼ばれればprint2を呼び出すように設定していきます。
そして、事前にprint1/print2で呼び出す関数を設定していきます。ここのprint1関数の部分が音声認識とspeech to text APIを利用した文字起こしの機能が含まれていますが、これは後ほどの記事で詳細説明させていただきます。
def print1():
    """
    ここにspeech to textのshortをいれる
    変数名がdispatch_dictonaryで分岐されて呼び出される形式。とりあえずprint1としてる
    """
    ad.audio_input()
    local_file_path = "/Users/sugimurakazuya/pycharm/speech_to_text_fromgithub/result.wav"
    short_long = speech.time_mesurement(local_file_path)
    text = speech.audio_recognize(local_file_path, short_long)

    return text


def print2():
    """
    ここにspeech to textのlongをいれる
    変数名がdispatch_dictonaryで分岐されて呼び出される形式。とりあえずprint2としてる
    """
    return templatelike.recording_end()


dispatch_dictionary = {"short": print1, "long": print2}
まとめ
まず今回はコードの全体像の中で、PySimpleGuiを利用したwindow表示の部分とボタンクリック時点での関数の呼び出し方法を説明してきました。
次回以降で実際に音声認識とSpeech to text APIを利用する部分を説明していきます。
関連記事: python speech to text APIを利用して音声認識ファイルを文字起こししてみよう
pythonでGoogleが提供するspeech to text APIを利用して音声認識ファイルを文字起こししてみます。speech to text APIの基本的な使い方、Macでのマイクを利用したwavファイルの作成方法、pythonでのメジャーGUIツールを利用した感想などを紹介していきます。
- python: speech to text APIを利用して音声認識ファイルを文字起こししてみよう
- python: speech to text APIを利用して音声認識ファイルを文字起こし〜シリーズ2 手順説明〜
- python: speech to text APIを利用して音声認識ファイルを文字起こし〜シリーズ3 スクリプト説明(1)〜
- python: speech to text APIを利用して音声認識ファイルを文字起こし〜シリーズ4 スクリプト説明(2)〜
- python: speech to text APIを利用して音声認識ファイルを文字起こし〜シリーズ5 スクリプト説明(3)〜