
Target Users
- who want to use GAS(google apps script)
- who need paid leave management system but not prepared it
- who want to perform paid management at zero cost
- who have built an internal system centered on GAS
Information Notice
This article only shows the finished image and the actual script. Therefore, we will explain in detail the design and setting for google forms and spreadsheet, registration of SlackBot, etc. when we explain the script at a later date. This time, it is for the person who can see only the screen and the reference of the script.
Actual flow with screen shot
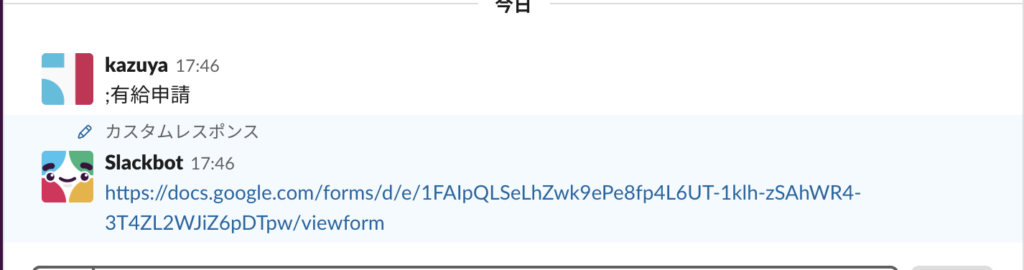
Step1: from slack bot, asking application form
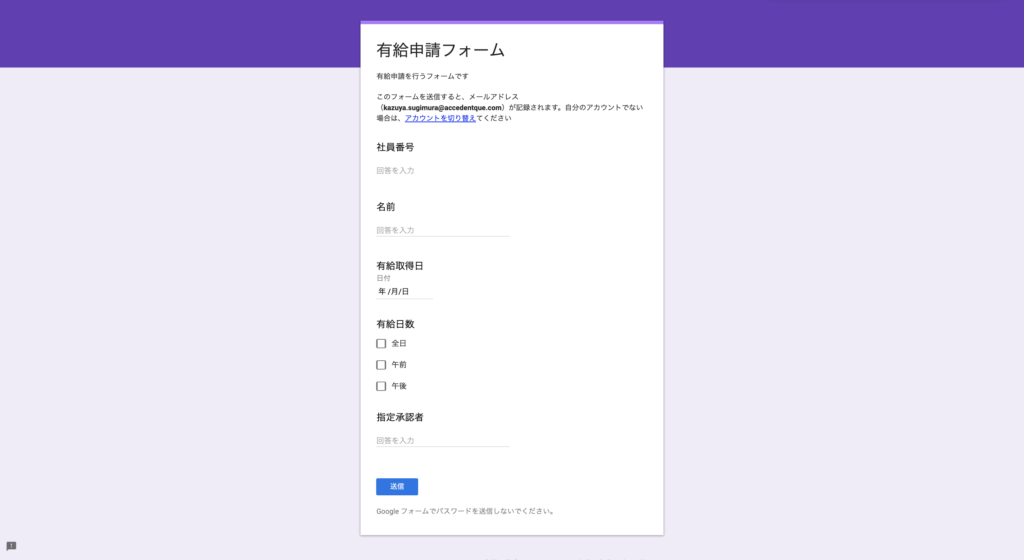
Step2: input information to google form
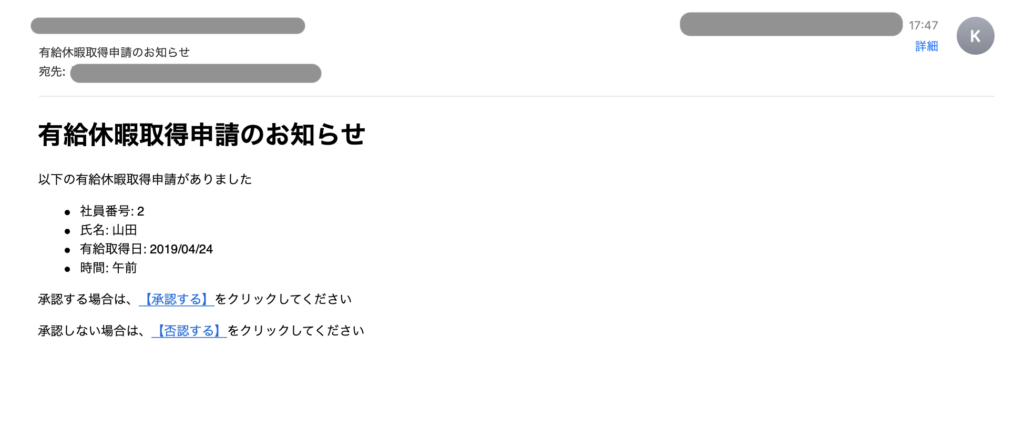
Step3: sending automatically e-mail about paid leave request to approver
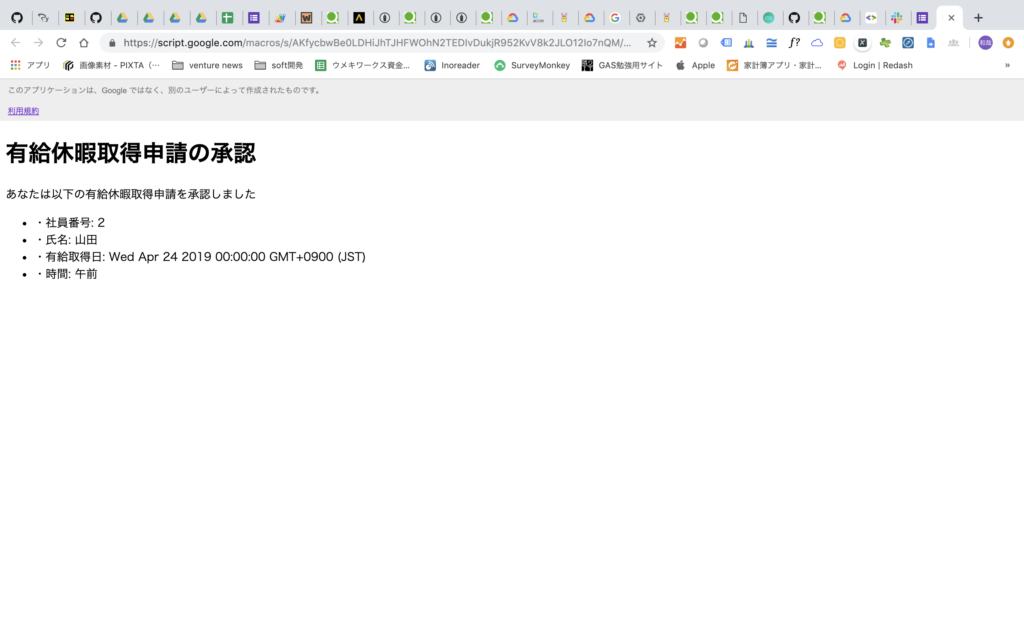
Step4: after clicking approve/ reject button in e-mail, redirect to Html page(with approval result)
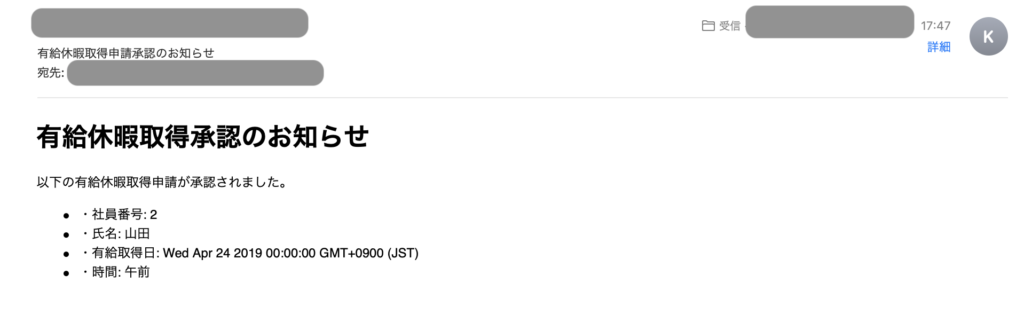
Step5: sending automatically e-mail about result of approval request to applicant
In the above flow, although the basic email is used, the WorkFlow process has been completed as of Form input → Application notification → Approval result report → Email notification to applicant.
Application items and status etc. are aggregated in spreadsheet. (Customize GoogleForm input result sheet)
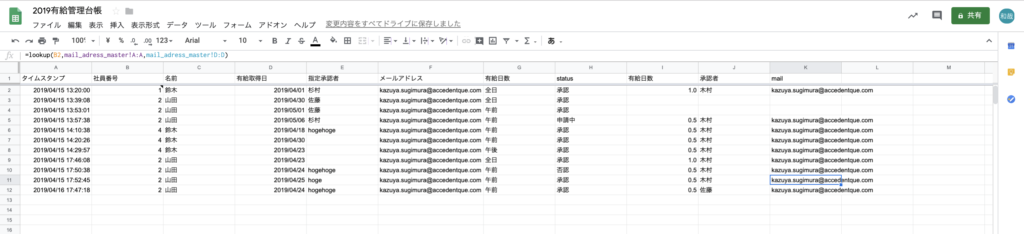
Based on the applicant ID (in this case, the employee number is used as the identification value), an employee master that specifies the approver’s address is also set up on the spreadsheet, so that mail will be sent to the recipient corresponding to the applicant.

The number of remaining paid leave and the number of paid leave acquisitions for the current year by individual are listed in a separate sheet

Script
following is actual script (because this time does not specify using Slack etc., it can be processed with three functions)
function sendMessage(e) {
  /*
  <summary>
   Receive the contents registered in Form as e parameter, extract necessary data from SS,
    Send an email to the approver. An option of approval / denial is given as the content of the mail.
    Register the status of the registered data as "Applying" in SS
  */

  //Obtain the row of the target sheet from e-parameters, etc., then register on target cell in spreadsheet as pending
  var row = e.range.getRow();
  var sheet = SpreadsheetApp.openById("XXXX").getSheetByName("有給申請管理"); //XXXX -> change actual spreadsheetID
  sheet.getRange(row,8).setValue("申請中");

  // Create Body to be pasted into email from generateBody function
  var bodies = generateBody(e.values);

  // url published this GAS in web application, add row and answer as address + parameter
  var url = "https://script...."+ "?row=" + row +"&answer="; //https:...以下ををスクリプトをウェブアプリケーションとして公開した際に表示されるURLへ変更


  //Get the approver's email. Insert the calculation formula in the sheet target cell in advance (here, it is OK to search by inserting conditional branches on GAS)
  sheet.getRange(row, 9).setValue("=if(G"+ row +"="全日",1,0.5)");
  sheet.getRange(row, 10).setValue("=lookup(B"+ row + ",mail_adress_master!A:A,mail_adress_master!C:C)");
  sheet.getRange(row, 11).setValue("=lookup(B"+ row +",mail_adress_master!A:A,mail_adress_master!D:D)");
  var approver = sheet.getRange(row,11).getValue();

  var recipient = approver;
  var subject = "有給休暇取得申請のお知らせ";

  var body = "";
  body += '有給休暇取得申請がありましたnn';
  body += bodies.plane;
  body += "承認する場合は以下をクリック";
  body += url + "ok";
  body += "承認しない場合は以下をクリック";
  body += url + "ng";

  var html ="";
  html += '<h1>有給休暇取得申請のお知らせ</h1>';
  html += '<p>以下の有給休暇取得申請がありました</p>';
  html += bodies.html;
  html += "<p>承認する場合は、<a href="+ url + "ok>【承認する】</a>をクリックしてください</p>"
  html += "<p>承認しない場合は、<a href="+ url + "ng>【否認する】</a>をクリックしてください</p>"

  GmailApp.sendEmail(recipient, subject, body, {htmlBody:html});

}


function doGet(e){
  /*
  <summary>
   After the approver makes a selection by e-mail, the selected result is reflected in the SS Status item.
    In addition, e-mail the result to the applicant. Then, the selected result is displayed on the browser screen for the approver.
  */

  var row = e.parameter.row;
  var sheet = SpreadsheetApp.openById("XXXX").getSheetByName("有給申請管理"); //XXXXをSSのIDへ変更
  var values = sheet.getRange(row, 1, 1, 7).getValues()[0];
  Logger.log(values);

  var bodies = generateBody(values);
  var answers = e.parameter.answer;
  var result = {
    ok:"承認",
    ng:"否認"
  };

  var recipient = values[5];

  if(answers){
  sheet.getRange(row, 8).setValue(result[answers]);

  var subject = "有給休暇取得申請" + result[answers] +"のお知らせ";
  var body = "";
  body += '以下の有給休暇取得申請が'+ result[answers] +'されました。nn';
  body += bodies.plane;

  var html = '';
  html += '<h1>有給休暇取得'+ result[answers] +'のお知らせ</h1>';
  html += '<p>以下の有給休暇取得申請が'+ result[answers] +'されました。</p>';
  html += bodies.html;

  GmailApp.sendEmail(recipient, subject, body, {htmlBody:html});

  var html = '';
  html += '<h1>有給休暇取得申請の'+ result[answers] + '</h1>';
  html += '<p>あなたは以下の有給休暇取得申請を'+ result[answers] +'しました</p>';
  html += bodies.html;

  return HtmlService.createHtmlOutput(html);
  };
}

function generateBody(values){

  var staff_num = values[1];
  var staff_name = values[2];
  var date = values[3];
  var hours = values[6];

  var plane = "";
  plane += '社員番号: ' + staff_num + 'n';
  plane += '氏名: ' + staff_name + 'n';
  plane += '有給取得日: ' + date + ' n';
  plane += '時間: ' + hours + 'n';

  var html = '';
  html += '<ul>';
  html += '<li>社員番号: ' + staff_num + '</li>';
  html += '<li>氏名: ' + staff_name + '</li>';
  html += '<li>有給取得日: ' + date + ' </li>';
  html += '<li>時間: ' + hours + '</li>';
  html += '</ul>';

  return {plane:plane, html:html};
}
Finally,
This time, without any explanation, only the screen shot and actual script are posted. I hope that you will understand that a simple workflow system can be built with GAS alone while trying to understand. Many companies will reluctant to pay the extra cost, so I think it is good to try to make the paid acquisition management by yourself while acquiring the GAS ability to maintain on your own.
From next time, I will explain the actual design and settings, and explain the code.
連載目次: GASで有給取得申請管理
- GASをフル活用して有給管理システムを自作する
- GASをフル活用して有給管理システムを自作する〜利用コードと実際画面フロー〜
- 【コード解説シリーズ】GASをフル活用して有給管理システムを自作する〜まずは設定から〜
- 【コード解説シリーズ】GASをフル活用して有給管理システムを自作する〜申請者がForm登録したタイミングで承認者にメールを送る(GAS htmlメールの設定とトリガー設定)〜
- 【コード解説シリーズ】GASをフル活用して有給管理システムを自作する〜承認者がメールの承認・否認を選択→申請者へ結果通知、承認者へ完了Web画面表示〜